OakshieldDream

Posts : 332
Join date : 2014-04-19
Age : 35
Location : beach of Kashyyyk!!
 |  Subject: Jessi Photoshop Tutorial: Create a Magical Photo Manipulation (high difficulty) Subject: Jessi Photoshop Tutorial: Create a Magical Photo Manipulation (high difficulty)  Thu Jun 26, 2014 8:51 pm Thu Jun 26, 2014 8:51 pm | |
| Hello guys!!!! In this tutorial, I will show you the steps I took to Create a Magical Photo Manipulation with Flowery Effect in Photoshop. This is an intermediate tutorial so some steps can be tricky, but why not have a try 
Along the way, we will use some photo retouch skills, create a flower particle brush and add a flying rose to the image 
In case you haven't heard NextDayFlyers is an environmentally conscious printer, they even have a solar powered facility. If something is not understood, or any questions please ask!
Here is a preview of the final effect I have for this tutorial.
- Final:
get to work!________________________________________________________________________________________________ Step 1Create a new document size 780px * 1100px with black background, load the model image into Photoshop, cut out of the model and paste it onto our document as shown below:
- Spoiler:
Use a soft eraser tool, tidy up the edges of the model as shown below:
- Spoiler:
- Spoiler:
Remove the feet of the model with the eraser tool to produce some floating, surreal effect:
- Spoiler:
You can also use the liquify filter (use the forward warping tool) to add some flying effect on the silky part of the sword on top:
- Spoiler:
Use the the Sharpen Tool with around 20% strength to sharpen the eye areas of the model a bit:
- Spoiler:
and here is the effect so far:
- Spoiler:
------------------------------------------------------------------------------------------------------- Step 2Let's add the following image adjustment layer as clipping mask for this model layer:_______________
Black and White
Reds = -1
Yelows = 54
Greens = 23
Cyans = 58
Blues = 23
Magentas = 54
_______________ On the layer mask of this black and white adjustment layer, reveal the following area:- Spoiler:
__________
Levels :
29 0.81 255
Output Levels: 0 255
___________
Brightness and Contrast
0
100
(Unmark use legacy)
____________and here is the effect so far:- Spoiler:
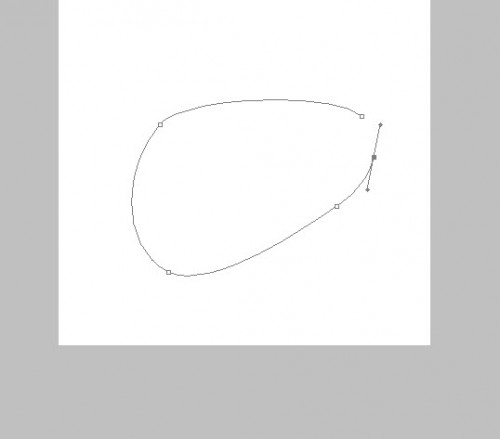
-------------------------------------------------------------------------------------------------------------- Step 3Now let's create a new brush to add some flower particle effect to the image - to do this, create a new document and use the Pen Tool to draw a shape like below and close the path:- Spoiler:
 ]
Fill the path with black colour, and turn off the background layer, use the Image > Trim and trim off the transparent pixels:- Spoiler:
Use this newly created brush, paint some particles around the model as shown below with red colour:- Spoiler:
Also paint some bigger particles around the canvas with a lower opacity, as shown below:- Spoiler:
-------------------------------------------------------------------------------------------------------------- Step 4Now we will add the rose into the image. Load the rose stock image into Photoshop, use the magic wand tool to select the rose, and copy it out:- Spoiler:
Paste the selection onto our document, flip it horizontally once and apply the following motion blur setting to it:____________
Angle : 17
Distance: 6
____________And you will have the following effect:- Spoiler:
In order to produce a flying effect, we can add some warped cloud (render the cloud via the cloud filter) behind the rose: (check out this tutorial on PSD Vault if you have issue with the cloud warp (scroll down and find the cloud warp section)
- Spoiler:
Duplicate the cloud layer twice, resize them to a smaller scale and attach them to different areas of the cloud, in order to add some variety:- Spoiler:
--------------------------------------------------------------------------------------------------------------- Step 5We're almost done! For some final retouches, I added a curvy line with Pen Tool to the model as shown below:- Spoiler:
Further rendered some cloud around the model:- Spoiler:
Also added some cloud/aura effect around sword:- Spoiler:
Added some highlight on the sword to make it shine: (this is done via a soft white brush painting)- Spoiler:
Use the warp tool to adjust the highlight in order to fit the shape of the sword:- Spoiler:
and here is the effect so far:- Spoiler:
Furthermore, you can add some colour to the cloud and sword to make the image look more magical and surreal:- Spoiler:
I then further added some colour and light adjustments and here is the final effect I have: (click to enlarge)Warm Version- Spoiler:
Cold Version (My Favorite)- Spoiler:
That's it for this tutorial! Hope you enjoy it and find it useful!, If you do not understand something or there grammatical errors, forgive me and let me know!.I think it has podreis learn to use multiple effects, and counted 7 hope you serve a lot and using! , Show me your experiments!
A big kiss!
And have a nice day!
Jessi |
|


