OakshieldDream

Posts : 332
Join date : 2014-04-19
Age : 35
Location : beach of Kashyyyk!!
 |  Subject: Jessi Photoshop Tutorial: Greenberg Subject: Jessi Photoshop Tutorial: Greenberg  Mon Jul 28, 2014 11:08 pm Mon Jul 28, 2014 11:08 pm | |
| Hi all guys. It has been a while since the last tutorial, but today I bring you a tutorial to create a stunning effect, is the famous "Greenberg" effect, I'll show (not as professional as) to take pictures similar to this great artist.
Greenberg is the effect?
For more than a digital effect, is a type of lighting where there are multiple light sources enhancing the texture and volume of the subject in the photo. There are two lights on the sides to create a soft edge on the subject, A light behind and above that enhances hair texture rather than creating a halo, a back light that illuminates the bottom of the background and creates a gradient almost black in the top of the photo, a light that illuminates the face of the person, produced by a source of soft and hard light, like a large metal umbrella or beauty dish, a reflector that fills the shadows under the collar and make a twinkle in his eyes.
Now you will say, is worth and meaning.
I have some photos of this famous artist:- Spoiler:
Amazing right? Therefore begin.________________________________________________________________________________
Step 1: Remove the bottom
To start with Jill Greenberg look Photoshop tutorial, you must select the person and
remove the background. Be sure to do this step and the next with great care and
precision.
________________________________________________________________________________
Step 2: Create new fund
Use the Radial Gradient tool and gradient from blue to white to create appearance
backlit photo. Do not forget to create new layers for each step.
________________________________________________________________________________
Step 3: Touch Up Object
Start by reducing image noise. Then smooth the skin with
blur tool (this is of my own), select and increase the saturation of the
eyes.
________________________________________________________________________________
Step 4: Dodge and Burn
This is the most important step in this tutorial to create the effect on Jill Greenberg
Photoshop. Done correctly this creates a smooth appearance and high pass without the use of
shoot with a ring of light.
At this stage, we basically need to lighten areas of light and dark dark.
Although at some point it is necessary to lighten dark areas also.
Switch to Lab mode, select the Lightness channel and select the Dodge tool
tool light and the dark Burn tools.
Select highlights tool palette and you lighten shadows, if you need to
lighten dark areas. exposure settings should be in the range of 5 -
15%. To accentuate any area of the painting several times. highlight hair, cheeks, and other
Near logical and natural way to lighten or darken. Back to RGB mode.
Important: To see the results of their work in full color while you are
working on the Lightness channel to create a new window (Window-> Arrange-> New
window) and select all channels of this window.
________________________________________________________________________________
Step 5. Add Local Contrast
Use the Unsharp Mask filter: Amount = 53, Radius = 22 to increase the contrast
Local on the picture.
________________________________________________________________________________
Step 6. Apply high pass sharpening
Sharpen the photo using the High Pass filter high pass my opinion radius 5-10 not
author .. We're almost done.
________________________________________________________________________________
7. Reduce the saturation a bit
Using the Hue / Saturation tool to reduce saturation to -10. This will make the
softer colors.
--------------------------------------------------------------------------------------------
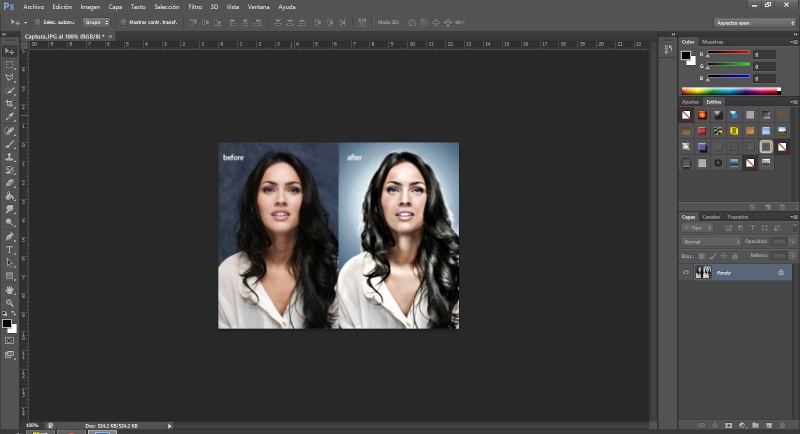
And I think we ended up staying quite simple and clear, now you can see the before and after, amazing right? , I Use the famous Megan Fox, I get something like this:

Impressive right? , For practicing and please post your projects.
A big hello! And thanks for reading.
Until the next tutorial!! |
|
Guest
Guest

 |  Subject: Re: Jessi Photoshop Tutorial: Greenberg Subject: Re: Jessi Photoshop Tutorial: Greenberg  Mon Jul 28, 2014 11:20 pm Mon Jul 28, 2014 11:20 pm | |
| Nice tutorial! +1 from me  |
|
OakshieldDream

Posts : 332
Join date : 2014-04-19
Age : 35
Location : beach of Kashyyyk!!
 |  Subject: Re: Jessi Photoshop Tutorial: Greenberg Subject: Re: Jessi Photoshop Tutorial: Greenberg  Mon Jul 28, 2014 11:44 pm Mon Jul 28, 2014 11:44 pm | |
| Thanks Tesvixen! I'm glad you like it, a big greeting and thank you! |
|
Cpt.Rex

Posts : 3835
Join date : 2014-02-23
Age : 47
Location : Germany
Character sheet
Name: Character
Faction:
Level:
 | |
Sponsored content
 |  Subject: Re: Jessi Photoshop Tutorial: Greenberg Subject: Re: Jessi Photoshop Tutorial: Greenberg  | |
| |
|


